Command Division: Difference between revisions
From Star Trek: Theurgy Wiki
Auctor Lucan (talk | contribs) No edit summary |
Auctor Lucan (talk | contribs) No edit summary |
||
| (3 intermediate revisions by the same user not shown) | |||
| Line 2: | Line 2: | ||
Command officers included most all of the admiralty, captains, executive officers, diplomats, adjutants, intelligence officers, pilots, and '''[[CONN]] officers''' (flight controllers/helmsmen). [[Command Division|Command division]] personnel also filled posts as '''[[tactical]] officers''' and sometimes in ordnance departments. [[http://memory-alpha.wikia.com/wiki/Command_division Source: Memory Alpha]] | Command officers included most all of the admiralty, captains, executive officers, diplomats, adjutants, intelligence officers, pilots, and '''[[CONN]] officers''' (flight controllers/helmsmen). [[Command Division|Command division]] personnel also filled posts as '''[[tactical]] officers''' and sometimes in ordnance departments. [[http://memory-alpha.wikia.com/wiki/Command_division Source: Memory Alpha]] | ||
==Mission Status== | |||
This segment describes the current situation aboard the ''Theurgy''. | |||
UNDER CONSTRUCTION | |||
==Command== | ==Command== | ||
| Line 14: | Line 19: | ||
Besides acting as flight control for [[Tactical Conn|Tactical CONN]], Mission Ops was also responsible for monitoring telemetry from primary mission Away Teams. This included [[tricorder]] data and any other mission-specific instrumentation. So, Mission Ops was responsible for monitoring the activities of secondary missions to anticipate requirements and possible conflicts. In cases where such conflicts impact on primary missions in progress, Mission Ops notified the [[Operations]] officer. During Alert and crisis situations, Mission Ops also assisted the [[Tactical]] Officer, providing information on Tacical [[CONN]], Away Teams and secondary mission [[operations]], with emphasis on possible impact on [[tactical]] concerns. | Besides acting as flight control for [[Tactical Conn|Tactical CONN]], Mission Ops was also responsible for monitoring telemetry from primary mission Away Teams. This included [[tricorder]] data and any other mission-specific instrumentation. So, Mission Ops was responsible for monitoring the activities of secondary missions to anticipate requirements and possible conflicts. In cases where such conflicts impact on primary missions in progress, Mission Ops notified the [[Operations]] officer. During Alert and crisis situations, Mission Ops also assisted the [[Tactical]] Officer, providing information on Tacical [[CONN]], Away Teams and secondary mission [[operations]], with emphasis on possible impact on [[tactical]] concerns. | ||
==Other Command Division Departments== | |||
As of 2381, all [[Starfleet]] Officers who had red [[uniforms]] belonged to the [[Command Division]], and besides the roles in Command and Mission Ops, these were the other Departments that belonged to this division: | |||
* [[Diplomatic Corps|Federation Diplomatic Corps]] | |||
* [[Starfleet Intelligence]] | |||
* [[CONN]] | |||
* [[Tactical]] | |||
For more information on these departments, click the above links. | |||
== MVAM Procedure Transcript == | == MVAM Procedure Transcript == | ||
| Line 37: | Line 51: | ||
<br> | <br> | ||
<b>Computer:</b> Reintegration sequence complete.<br> | <b>Computer:</b> Reintegration sequence complete.<br> | ||
== Phonetic Alphabet == | == Phonetic Alphabet == | ||
Latest revision as of 12:42, 8 March 2022
The Command Division was the corps of officers and crewmen within Starfleet who specialized in command and control functions on starbases, aboard starships, and at Starfleet Command. Members of the command division were trained in leadership and had tactical training allowing them to decisively take action in organizing and mobilizing Starfleet crews to perform missions.
Command officers included most all of the admiralty, captains, executive officers, diplomats, adjutants, intelligence officers, pilots, and CONN officers (flight controllers/helmsmen). Command division personnel also filled posts as tactical officers and sometimes in ordnance departments. [Source: Memory Alpha]
Mission Status
This segment describes the current situation aboard the Theurgy.
UNDER CONSTRUCTION
Command
This department was reserved for the ship's Commanding Officer, Executive Officer, Second Officer, and Third Officer. These three were responsible for handing out orders to the rest of the departments in order to keep the ship running. Command covered a wide range of interpersonal interactions, especially leadership, negotiation, and both coordinating and motivating others. It also included discipline and resisting coercion, as well as helping others resist fear and panic. They were also daring, making a split-second command decision, or - as earlier mentioned - resisting fear or coercion. They also had to judge the mood and morale of a group of subordinates, or to try and assuage the fears of a group, to rally or inspire others during a difficult situation, or to command the attention or respect of someone hostile. They also had to use reasoning, to consider and evaluate the orders given by a superior, or to find a solution to a difficult diplomatic or legal situation.
Indeed, the operational authority for the starship rested with the Commanding Officer, the Executive Officer, Second Officer, or the Third Officer. These officers had to be able to carefully and precisely coordinate a group of subordinates, or to give detailed orders. The Commanding Officer was responsible for execution of Starfleet orders and policy, as well as for interpretation and compliance with Federation law and diplomatic directives. As such, the Commanding Officer was directly answerable to Starfleet Command for the performance of the ship.
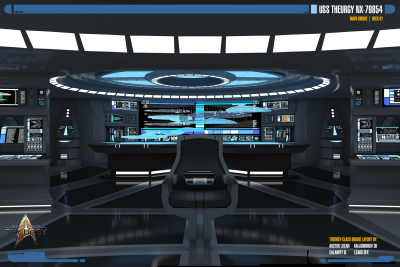
The Main Bridge command chair provided seating and information displays for the Commanding Officer. The command chair was centrally located, designed to maximise interaction with all key bridge personnel, while permitting an unobstructed view of the main viewscreen. The captain's chair featured armrests that incorporate miniaturised status displays, and simplified Conn and Ops controls. Upon keyboard or vocal command, the captain could use these controls to override the basic operation of the spacecraft. Such overrides were generally reserved for emergency situations. The other two seating positions in the command area included somewhat larger information display terminal screens, which permitted these officers to access and input data as part of their duties.
Mission Ops
The aft area of the Theurgy main bridge was Mission Ops, and this was where the Executive Officer oversaw operations ranging from the Master System Display to Tactical CONN coordination. This station was also specifically responsible for monitoring activity relating to secondary missions. In doing so, Mission Ops often had an assistant officer that helped he Executive Officer, relieving him/her of responsibility for lower-priority tasks that must be monitored by a human operator. Although the minute-to-minute assignment of resources would be automatically handled by the Operations station on the bridge, Mission Ops would monitor the computer activity to ensure that such computer control does not unduly compromise any mission priorities. This was particularly important during unforeseen situations that might not fall within the parameters of preprogrammed decision-making software. Essentially, Mission Ops was responsible for resolving low-level conflicts, but would refer primary mission conflicts to the Operations station. Mission Ops generally served as relief for Operations when the duty Ops officer was away from station.
Besides acting as flight control for Tactical CONN, Mission Ops was also responsible for monitoring telemetry from primary mission Away Teams. This included tricorder data and any other mission-specific instrumentation. So, Mission Ops was responsible for monitoring the activities of secondary missions to anticipate requirements and possible conflicts. In cases where such conflicts impact on primary missions in progress, Mission Ops notified the Operations officer. During Alert and crisis situations, Mission Ops also assisted the Tactical Officer, providing information on Tacical CONN, Away Teams and secondary mission operations, with emphasis on possible impact on tactical concerns.
Other Command Division Departments
As of 2381, all Starfleet Officers who had red uniforms belonged to the Command Division, and besides the roles in Command and Mission Ops, these were the other Departments that belonged to this division:
For more information on these departments, click the above links.
MVAM Procedure Transcript
For when MVAM is executed via computer and not by use of the auxiliary Battle Bridges.
Captain/Commanding Officer: Engage the multi-vector assault mode.
Computer: Initiating decoupling sequence. Auto-separation in ten seconds. Nine. Eight. Seven. Six. Five. Four. Three. Two. One. Separation sequence in progress.
Tactical Officer: We are in attack formation. Each section is armed and responding to our command.
Captain/Commanding Officer: Attack pattern ["Beta four seven" or the like].
Computer: Specify target.
Captain/Commanding Officer: [State vessel], bearing ["one six two mark seven" or the like].
Computer: Pattern and target confirmed.
[Post battle]
Captain/Commanding Officer: Begin the reintegration sequence then get me a full damage report.
Computer: Reintegration sequence complete.
Phonetic Alphabet
The phonetic alphabet is a standardized series of unique sounding words used to spell out letters in order to avoid the confusion of similar sounding letters. Note that some of the letters or numbers have exaggerated pronunciation in order to differentiate them from other words, the numbers five (pronounced "fife" to avoid confusion with the word "fire") and "niner" (to avoid confusion with the German word for "no").
| Alpha (AL fah) | Mike (MIKE) | Yankee (YANG key) |
| Bravo (BRAH VOH) | November (no VEM ber) | Zulu (ZOO loo) |
| Charlie (CHAR lee) | Oscar (OSS cah) | 0 (ZEE ro) |
| Delta (DELL tah) | Papa (pah PAH) | 1 (WUN) |
| Echo (ECK oh) | Quebec (keh BECK) | 2 (TOO) |
| Foxtrot (FOKS trot) | Romeo (ROW me oh) | 3 (TREE) |
| Golf (GOLF) | Sierra (see AIR rah) | 4 (FOW er) |
| Hotel (hoh TELL) | Tango (TANG go) | 5 (FIFE) |
| India (IN dee ah) | Uniform (YOU nee form) | 6 (SIX) |
| Juliet (JEW lee ET) | Victor (VIK tah) | 7 (SEV en) |
| Kilo (KEY loh) | Whiskey (WHIS key) | 8 (AIT) |
| Lima (LEE mah) | X Ray (ECKS RAY) | 9 (NINE r) |
Disclaimer
- Starfleet Tactical Emblem used with permission of Gazomg Art - granted Nov 24, 2016
- Some edited texts are from the Starfleet Technical Manual.


